

In this first Rising Empires 2 tutorial we will show an example on how to play the first turn. If you have not installed Rising Empires it can be found on Google Play. We use a Human empire which starts on the Surface. This is the terrain around the capital city with some comments:
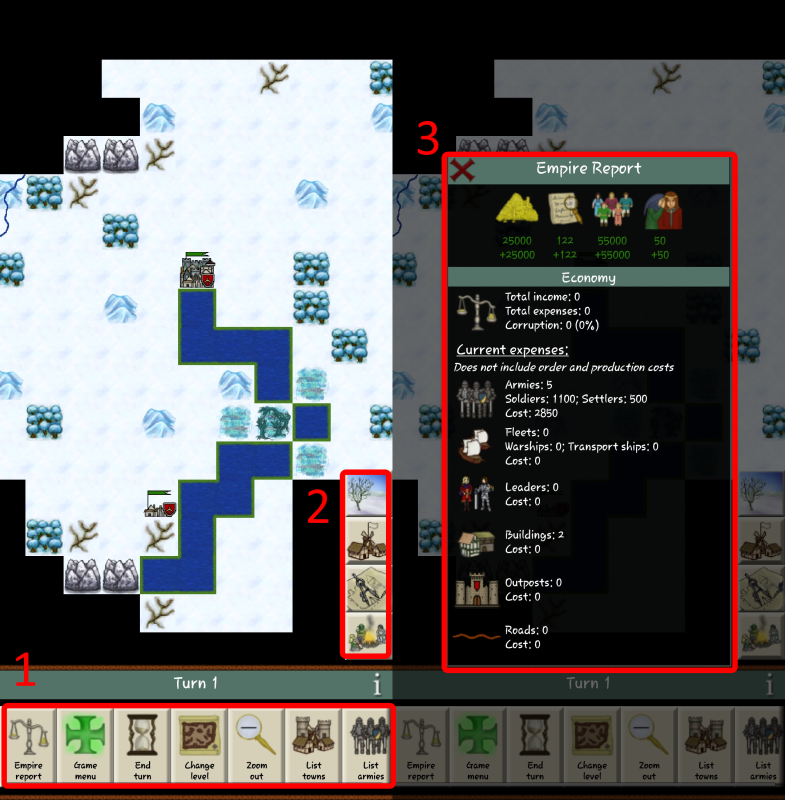
1 – These buttons are the main game buttons. You can swipe horizontally through these buttons at the bottom of your screen. Some will not be entirely visible until you do. From left to right these are:
 | Empire report | This button opens the empire report (see point 3 below). |
 | Game menu | Open the game menu. From this menu you can access the barracks, diplomacy, research, information about season and weather, history and save the current game. |
 | End turn | When you have issued all orders and are satisfied, press here to start the next turn. |
 | Change level | This button allows you to swap between the Surface and the Netherworld. |
 | Zoom out | Allows you to zoom out and focus on another area of the map. |
 | List towns | This button opens a list of all towns in your empire. |
 | List armies | This button opens a list of all armies in your empire. |
 | List fleets | This button is only shown after Galley I has been completed. It opens a list of all fleets in your empire. |
2 – These buttons we call event buttons as they show current events in the empire. Clicking on them will focus on that event on the map and also open the corresponding information dialog.
 | Winter (season change) | As seasons change you will see notifications pop up indicating which you are currently in. Each season affects a multitude of factors when planning out your next move. |
 | Settlement information | This lists new settlements in your empire. These may be created by your own settlers or conquered from enemy empires. The first turn they give some tips on what to focus on and build in your starting settlements. |
 | Research update | Displays when primary or secondary research has completed or there is currently a research slot that is inactive (no research project assigned to it). |
 | Idle armies | Armies that currently have no orders will be indicated by this button. Tapping it will cycle through these armies and will only disappear once all armies have been issued order. If you want an army to stay put and not receive this notification you can assign them to garrison duty. |
3 – The empire report gives you a quick overview of all the important data in your empire. As you progress you can use this report to keep track of your economy, corruption and expenses.
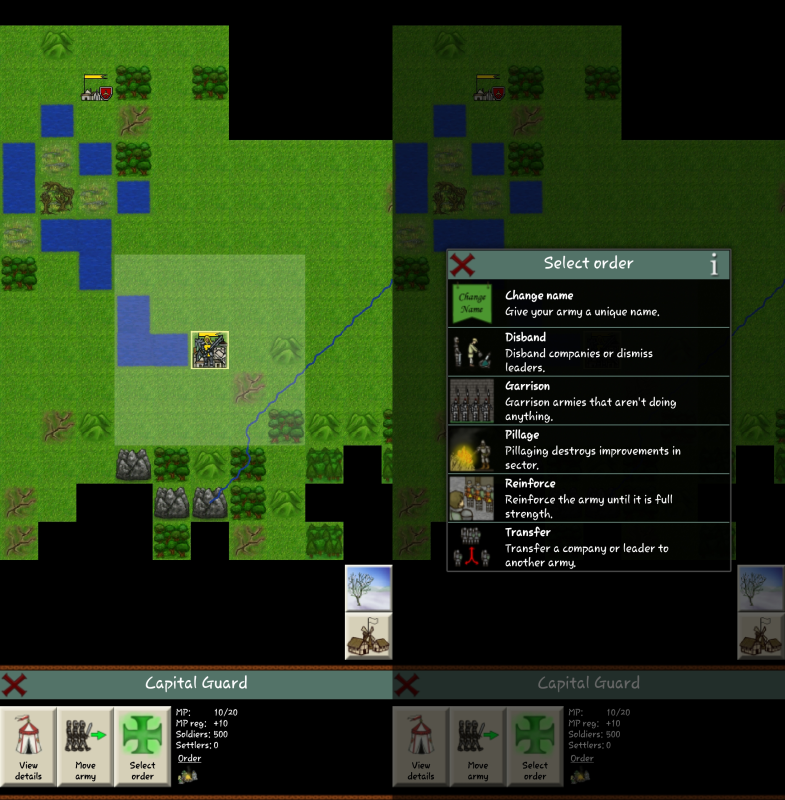
When you activate an army, either by using one of the buttons described above or by clicking on the sector and selecting an army, you get a series of buttons at the bottom of the screen. These are the possible army orders. The brighter sectors around the army is the sectors that can be seen by this army. Normally an army can see 2 sectors, but scout armies can see 3 sectors.
I’ll describe the different army orders starting with the tent to the left:
Army details – The ‘tent’ open a screen with details of the army. Here you can see exact movement data, what companies and their strength as well as changing name of the army. Change name by clicking on the current name in the top.
Movement – When this button has been selected you can click on the map to issue movement orders. You can click several sectors away from the army and let the game issue a route or you can click sector by sector to make it follow a path you decide. Clicking on the army deletes all movement orders.
Select order – Opens up the order menu. The orders show in the order menu will depend on the situation and type of army. For example, an embarked army will only see two possible orders; change name and disembark.
Below are some comments about the possible orders in the select order menu:
Transfer companies – If there are other armies in the same sector you can transfer companies to it.
Garrison – When this button is selected the army will be ‘hidden’ from the event button that shows armies with no orders. This button is excellent for garrison armies that you do not want to move.
Build watchtower – Scouts and engineers can build watchtowers. These towers can spot enemies 3 sectors out and are good to keep an eye on your borders.
Disband – If you disband an army in a settlement its soldiers will become new population. When you disband an army in the wilderness the soldiers will just disappear. It cost some gold to disband an army and if the cost cannot be met the soldiers might disappear even if disbanded in a settlement.
There is one more order worth noting here in the tutorial, this is the settle order (a guy building a house). This is used when you want your settlers to become population in the settlement where the army is located or if you want them to build a new town.
When you have given orders to all your armies it’s time to activate your settlements. This is done is the same way as activating an army.
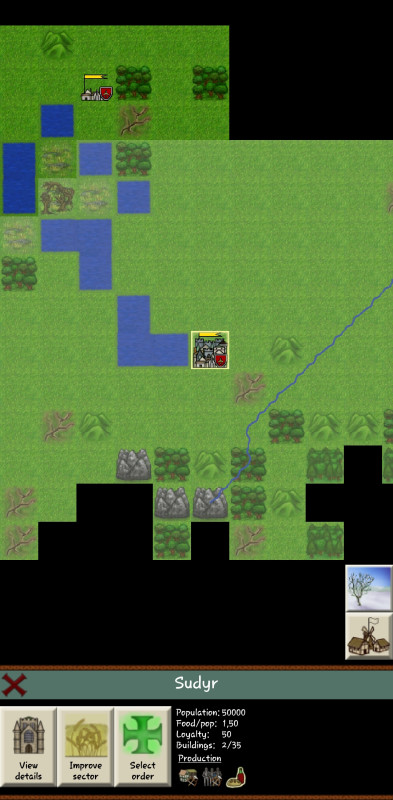
When activating a settlement, you are presented with three buttons to the left and to the right a summary of the settlement status. The buttons are:
Settlement details – The ‘gate’ open a screen with details of the settlement. See below for more information of what can be done inside a settlement.
Improve sector – When this button is selected it is possible to manually select which sector that shall be improved. Non-elven empires can also burn down forests from this screen while elven empires use it to grow new forests.
Select order – Opens up the order menu. For settlements most orders are done inside the settlement (see below).
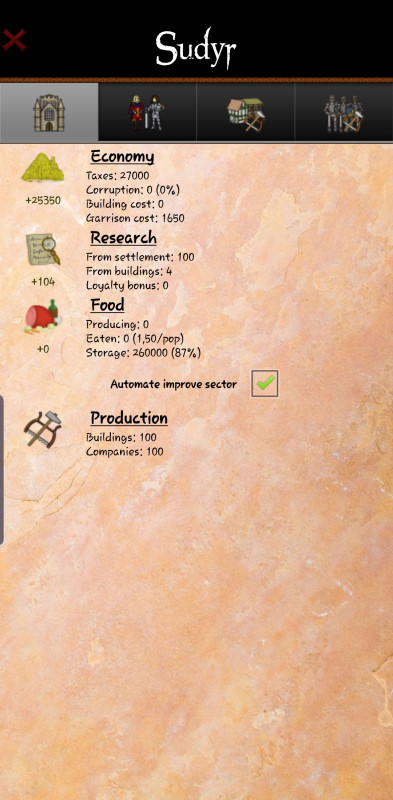
The settlement screen contains 4 tabs (5 after researching Galley I). The first one, which is showed in the image above, gives detailed information about the output of the settlement. We have economy, research, production capacity and food. Generally, you should always try to have a food per pop ration of 1.5 or above. This gives a better population growth. If it is less than 1.0 part of your population will starve. Sending away settlers is a good way to improve the food situation in a city as it decreases the population, and improving terrain is also very important step to keep your population well fed.
The second tab, with the leaders on it, gives information on what the settlement contains. You have leaders, population of the different races, constructed buildings and armies. In your capital city you should already have 2 buildings: a palace and a royal gardens.
The last two tabs (three after Galley I is researched) is for issuing production orders. You can add, remove and re-arrange your production queues as you see fit. You should always build at least one wall in all your border settlements. A couple of scouts is also handy in the beginning to find out where there is room to expand and where your enemies are…
Questions? Comments? Please let me know, either here by responding to this post, on the forum or by sending me an email. Good luck! 🙂
Note: Big thank you to ZiggyJustice for helping me improving this tutorial!